Home

All Speed Tips

Other Tips

Optimization Software

Tech News

Internet Security

Ask The PC Expert

Computer Jargon

Contact Us

Subscribe via Email

Subscribe via RSS


Recent Articles
Learn To Repair PCs With The Right Course
Buying a Refurbished PC
How to Optimize Droid Razr Battery
|
|
Change Computer Name in Windows 7 and Vista
Many new computers come with pre-set names and descriptions. A computer description is simply a computer name over a network. On the other hand, the computer name comes in handy when you're sharing files via Bluetooth, Infrared, or any other medium of file transfer. If you want to change the name of that computer system, the steps below will take you by the hand through the various processes in both Windows Vista and Windows 7.
Change Computer Name in Windows 7
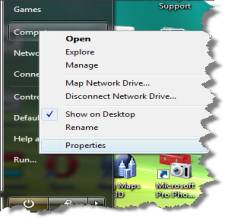
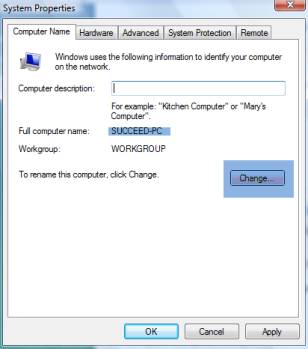
Click on the start button. The start menu will pop up, right-click on Computer and click on Properties. On the bottom right-hand side of the dialog, click on Change Settings. On the System Properties dialog, type a computer description – which is the name of a computer via a network. To change the name of the computer, click on Change. You can also click on the More button to change the primary DNS suffix of the computer.
Change Computer Name in Windows Vista
The same steps for changing a computer name running on Windows 7 are applicable to Windows Vista. Let's use pictures to describe the steps in Windows Vista.
Step.1 Click the Start button > On the Start Menu, right-click on Computer and click on Properties

Step.2 Click on Change Settings
Step.3 System Properties dialog box opens > on the dialog, go ahead and provide a description (a description is the name of a computer over a network).

Step.4 To change the name of your computer, click on change and OK.
If you enjoyed this post, please
or
|
-By Dominic
Web site and all contents © Copyright ComputerTooSlow.com 2012, All rights reserved.
|
|